
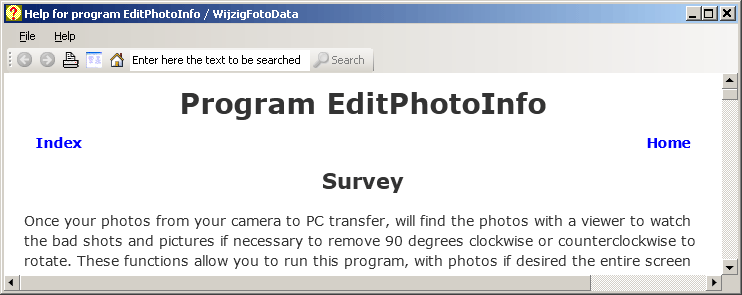
After the transfer of your photos from your camera to the PC, you will view the photos with a viewer to remove the bad shots and rotate if necessary photos. These functions can be done with this program, with photos displayed full screen. But the program can do more:
Most digital cameras store the image data (recording date, shutter speed, aperture, etc. in EXIF (EXchange bootable Information File) format in a section of the JPEG file in which the image is. This program uses this information in the viewer window to show and partly also edit these data. The recording data may be saved in a log file.
The file date of the file is right after shooting the same as the recording date. Will you then edit the image with a photo editing program, then the file date is changed. If you sort your photos then with the Windows Explorer, it may happen that the photos are no longer in the order in which they were taken. Program EditPhotoInfo can copy the original recording date from the EXIF section and reverts the file date to that value. Condition is that the photo editing program does not remove the EXIF information. If that does happen, the program asks for the recording date and place this information in a JPEG file in EXIF data block again.
The recording time of a JPEG image can be changed and stored in the EXIF data. If required, a fixed time interval at all recording times be added (in case the clock in the camera was set incorrectly). This may be important if you use GPS track log files to indicate where the pictures are made, see my GPS page on the Internet.
Do you, when making your photos, use a GPS receiver to record the track in a track log file, then you can read the track log file with this program and the GPS location can be added to the EXIF data, so you can show where the picture was taken.
The program Picassa (menu 'Tools' / 'Geotag') can with the Google Earth program be used to store the position in a photo if you do not have a GPS available.
If your photos contain GPS information, longitude and latitude where the picture was taken, then you can use this program to show where the picture was taken. That's possible with Google Maps or Google Earth.
The program can insert the photo recording date/time in the filename of a selected group of photos, optionally combined with a fixed text. If you do that before a photo editing program is used, then the recording date/time is not lost if a photo editing program destroys the EXIF information. In such a batch process, the name of the photographer and copyright statement can be put in the EXIF data block of each photo.
In the viewer, the file name of each photo individually and can be changed and a comment or description (caption) to be added to be used later by a photo presentation program like JAlbum. You can also set or adjust the recording time. In the latter case you can then use the pop-up menu to apply it to all selected photos.
The Viewer always displays the entire picture. However, if you have very wide panoramic photographs, then you can scroll horizontally through the panorama. The program has the possibility to make a web page for this panorama shots.
You can set certain parameters within the program, the are kept in a file's setting.
All changes are saved to a log file. The log file can be viewed via the Options window, you can also remove it there.
After the start of the program you see the next window: :
You see here the state of the program after the 'Change data' button is pressed and the required operations are performed. The program processes any JPEG files with jpg extension in the selected folder that meet the specified filter in the field 'File mask'. In the right pane you will see side by side the old and new filenames and other data which are changed. By clicking the 'Stop' button (or press the Escape key) you can abort the action, but the photos already changed will not be restored in the original state.
By clicking the ' Open 'button you will get an open file window where you can select a picture. You must do it in the directory where the files are that you want to edit. You can also with the explorer right click on a jpg file and then click 'Open With' to open this file with this program. If you 'Open with' the first time for a jpg file, you must first 'choose default program ... ' button and then browse to the file EditPhotoInfo.exe file.
If you are not yet familiar with program EditPhotoInfo, please create a copy of the directory that you want to edit. The program can change the file names and that operation could not be reversed unless you first made a backup. Remove the backup if you are satisfied with the results and know how to use program EditPhotoInfo.
In general, you want all files with extension jpg to be processed, in which case you use a wildcard symbol '*.jpg' in the 'File mask' input field. However, if a subset of the files should be manipulated, then use another file mask. If, for example all files with a starting 'P' should be processed, you make the file mask equal to 'P*.jpg'. You only want to process P4301133.jpg, fill in 'P4301133.jpg.'
Start all the files from your camera with a 'P', then it is advisable to not to start the new file names with a 'P', but for example with 'F' or the '(' symbol. If you later add new files from your camera in the folder and use the file mask 'P*.jpg', then only new files a renamed to a different name.
If you like to view first the photos and remove pictures or rotate and / or correct the record date, then click on the button 'Viewer'. You get the Viewer window discussed in next section. The corrections can best be completed before the file date and file name is changed. The viewer also enables you separately for each photo to edit the filename and the caption field.
The next panel shows a ' Browse' button to select the target directory, where to you later move or copy photos in the Viewer window, see below. The target directory can not be equal to the photo folder where the original pictures are! Would you use this, then you must also check the radio button for the 'Map:' box. It is also possible to check the radio button for 'Child map' to make automatically a sub folder in the photo folder where the pictures may be copied or moved.
In the panel 'Fetch camera positions from a track logfile' you can by clicking the Track log button add GPS locations to EXIF data in the photos, which is below described.
In the panel 'Google Earth and Google Maps files' you can by clicking the 'Make files' button, add links to the photo locations and make a Google Earth KML file to add waypoints to a JAlbum presentation. If check-mark "Make GoogleMap web-page' has been checked, a GoogleMap.html file is created to display the camera positions. That is below described. Set check-mark 'Back button closes window' if this page will be opened in a new window. After you have done this you can download the waypoints in Google Earth by clicking the 'Waypoints' button.
If the file date must be made equal to the recording date, then check the box "Change 'Changed' date into 'Recording' date".
In the Viewer you can correct the correct recording date of a photo, by checking the 'Show recording data' check box. You will see a bottom left a field with the the recording date in the format Year:Months:Days Hours:Minutes:Seconds. Simply type in the numbers, the year in 4 digits and all other fields in two digits. You may then right-clicking on the picture to open the pop-up menu and select 'Change the other recording dates in the same way' to apply the same time difference to the other photos.
If you tick the 'Change the photographer in:' box, then in the EXIF block of each picture's name is put the new name on the right.
If you tick the 'Change copyright in:' box, then in the EXIF block of each image is stored the copyright statement to the right.
If you tick the 'Remove from comment field :' box, then if the EXIF caption text is equal to this text it is removed. The viewer allows you to edit the caption for each photo.
Nothing will be done after you select 'Add to the file name to :' radio button 'Nothing '.
Would you, however, that the recording date and recording date in the filename is processed, then select the following radio button 'Recording date/time '. Should only the recording date in the file name to be put, then select the third radio button in this group. Since no two files with same name in a folder can exist and often more than a recording made on a given day, there will be a number added behind the date. The date is always in yymmdd format added in position yy is the year, in mm the number of the month and in dd the day of the month. Behind the date is a number of 1 or more digits, separated by '_' character. The first sequence number used for one day is shown in the box 'Start with sequence #', the default is 1. It is sometimes useful to increase this number. For example, if you took today already 20 photos and processed these with this program and later this day you made more pictures. If you changes the file names of the new pictures in the same way, you get another number 01 etc. unless you entered in the box 'Start with sequence #' value 21 to avoid duplicate serial numbers.
By the 4th radio button 'Just sequence # ' to select, there is only a number, starting with the number in the field 'Start with sequence #' value.
If you check the box 'Raise the sequence # automatically' option, then only unique serial numbers are used.
Before the above date and / or serial number you can add your own text in the text input box ' Prefix text:'. If for example pictures in Amsterdam have been made and you want a year's number of 4 digits, would you as a prefix to take 'Amsterdam_20'. In the second box, 'Suffix text:', fill in the text you like to see after the date. Leaves these boxes empty if you wants only the date in the filenames.
The next group 'Add this text as follows:' You can specify how the date, time, date and serial number in the filename to be processed. Select one of the 3 options.
The next group 'Use the following file extensions' you can specify whether small or capital letters should be used as file extension. By pressing the right 'Check extensions' button, the file extensions of the selected files are read and if necessary, changed according to the specified line.
If you check the box 'Rename corresponding files with the same name but another file extension', other files with the same name will also be renamed. Use this if you record your photos both in RAW and JPEG format.
After you set the parameters, press the 'Change data' button to the to perform the requested operations on the selected files.
It may happen that the EXIF information is lost because of an editing program that does not support EXIF data. In that case, the program asks if needed what the recording date was:
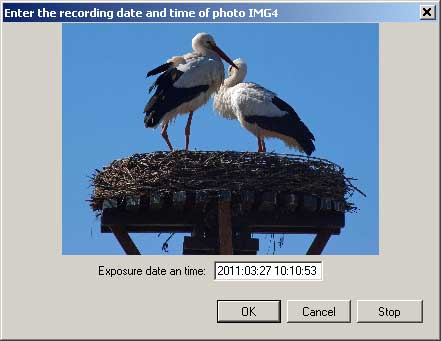
The system proposes as default the recording date and time value of the previous picture if available (only if a previous photo with a recording date was available).
Enter the recording date in the format Year:Month:Day Hours:Minutes:Seconds. Simply type in the numbers, the year in 4 digits and all other fields in two digits.
Click 'OK' if the date needs to be processed in the file in the window shown. If nothing should be done with the file, then click on 'Cancel' or 'Stop'. In the latter case, no further processing performed.
With the 'Check orientations' button you can control the orientation of the pictures in the selected folder and rotate all the pictures made in portrait mode automatically 90 °. This works only if your camera saves the orientation of the camera in the EXIF data of the photo.
The button 'Add locations to corresponding images' enables you to add GPS location and recording date/time to derived pictures like slide images made with the jAlbum program. This function enables you to use Improved Slide Show images for example Garmen-Adventure files made with the Garmin BaseCamp program. However it makes no sense to use this function if you have cheched "Include photographic data in generated images." in jAlbum panel Album > Settings > Advanced > Metadata, because than you include already all Exif data, also Exposure time, camera type etc.
In the right part of the main window is a message given to any operation in the large text window. That message is also written to a logfile.
By clicking the 'Slides' button, the Slides folder with the photos for a web site will be opened. This folder is normally created and filled by the JAlbum program via the Slide Show 4 skin. If you do this with the Ctrl key simultaneously pressed, the index file folder is shown.
When you click the "Update Google Maps link" button, the GoogleMap.html web file is created and the Google Maps link will be updated to this web page. You must then still upload the file index.html and GoogleMap.html to your server. This allows you to update album files that have been created before December 1, 2014, so that the Google Maps after 1 February can be viewed in a browser.
By clicking the 'Options' button you will get an options window:
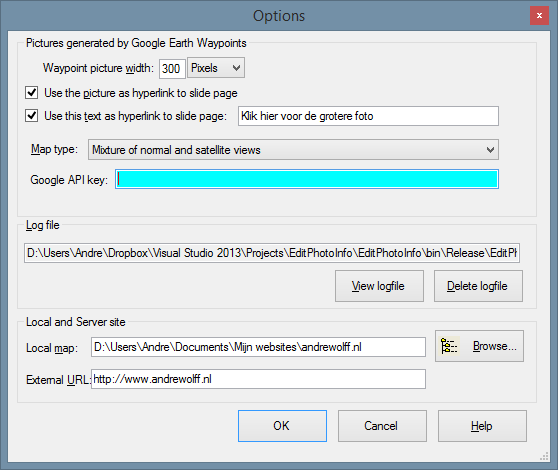
The first panel allows you to set the properties of the picture shown in a waypoint window. Example of such a window in Google Maps:
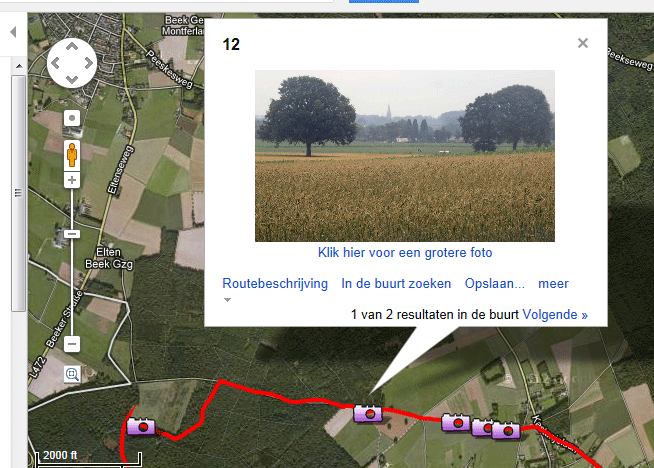
The pop-up window is shown if you click on a waypoint (camera icon). The waypoint indicates where the picture is recorded.
If You create a Google Earth KML file with the waypoints, you can also automatically create a web page GoogleMap.html to show the contents of the kml file in the browser. The combo-box 'Map type' allows you to choose the map type. Do you have a Google API key, then it is recommended to enter your API key in the next field, but you may leave tat field empty.
The information in the panel 'Local and Server site' is used to create the Waypoints file. The 'Local map' is the folder on your PC with the start file of your web site (e,g. index.html). Use the Browse button to select this folder. The 'External URL:' is the Internet address of the corresponding folder on the server.
Pressing the 'F1' function key possible in combination with the 'Ctrl' key on your keyboard or by clicking a Help button, next help file in a separate window:
Press simultaneously with the 'F1' key with the 'Shift' and 'Ctrl' key, to display the Help index .
By pressing only the F1 key you will get help for the button or control which currently has the focus.
In the help screen you see 2 menus are the top, with a toolbar and a browser window below as you see in the Internet Explorer.
On the buttons bar you see on the left side an arrow button to go back to the previous page and anther arrow button to move forward to a subsequent page. A print button is displayed to print the help file. Clicking the next button you will show the help index. Clicking the following button (the house) brings you back into the main window.
You can search for a text search by entering text in the text box on the toolbar and then click the 'Search' button.
You can use these and some other browser functions also run through the menu that appears when you right in the browser window.
For the text of the help file to slide, you can use the scroll bars around the browser window or you can use the wheel on your mouse. You can also use some keyboard shortcuts for Internet Explorer:
Even without the help button or F1 key, you can often get help: If you move the mouse slowly over a control (button, edit box, check box, etc.), the system displays a hint that explains the function of that control.
Click on the 'Viewer' button to show the pictures in the picture folder:

You see the Viewer window, where the pop-up menu is made visible by right clicking in the window.
The Viewer window shows the first picture in the selected folder that satisfies the chosen filter mask. By clicking on the  button the next picture shown and the
  button takes you back to the previous photo. Press simultaneously the Ctrl key on the keyboard, then respectively the last and the first picture of the selected set is displayed.
The Keyboard takes you to the next picture by pressing the Page Up key or the key combination Ctrl + Right Arrow to use. Previous photo gets you to see through the Page Down key or the key combination Ctrl + Left Arrow. The last picture can be reached through the Ctrl+End or Ctrl+Home keys combination.
You can also go to the next photo by clicking with the left mouse button in the current photo. If you have 3 mouse buttons and you click the middle mouse button in a picture, then the previous image is shown (unless you have the first pictures from the folder). Clicking the right mouse button in the photo will display the pop-up menu that you see in the figure above. Any actions you do with buttons on the bottom can also be done with pop-up menu and some actions can only be started via the pop-up menu.
You can also select a new photo with the browse ![]() button fully left. Next in an open file dialog window you can see the list of selected images. You can also view thumbnail images by clicking the 'View Menu' button top right button and then select Thumbnails. Click on the picture you want to see and then click OK (or double-click the picture).
button fully left. Next in an open file dialog window you can see the list of selected images. You can also view thumbnail images by clicking the 'View Menu' button top right button and then select Thumbnails. Click on the picture you want to see and then click OK (or double-click the picture).
If it is necessary that the picture should be rotated 90 degrees, you can do so with the  button (or Ctrl+R keys) to rotate 90° to the right. Click the
  button (or Ctrl+L key) to rotate 90° left. That is only possible with jpg files. You can also in advance rotate all the photos permanently in the correct position, as described above.
You can edit a photo with your default photo editor for JPEG files by pressing the  button. Previous photo will be displayed in the viewer window as otherwise the edited image can not be saved.. After you saved the photo in the editor use the button to see the result in the viewer.
By the  button (or Delete key) you can remove the photo from the selected folder and automatically display the next picture. The picture is done in the trash, so if you make a mistake, then you open the trash and then you right-click the extracted file and select 'Restore'. To see a restored file back into the viewer, you must return to the 'Viewer' button in the first window.
You can save the picture in lower resolution for use on a website by clicking the  button. The program will show a new window as described below.
You can also delete a picture by pressing the  button (or Ctrl+M keys) key. In that case, the image stored in the target folder that you selected on the main page.
If the photo is to be cloned, you can also press this button, but now with the Ctrl key. You can also copy pictures from the keyboard with the Ctrl+C combination.
By the  button (or F1 key) is this help file is shown as above has already been discussed.
Pressing the  button (or F4) button, closes the Viewer window. You can also do this via the right mouse pop-up menu.
Far right in the bottom toolbar and the pop-up menu, the file name that belongs to the picture is displayed. By editing the filename in the text box on the toolbar you can rename the file. You can make use of text in the clipboard (Ctrl+V key combination, or right in the text box clicks). Press the Enter or Tab key when you're finished changing the file name and press Ctrl+Z to undo a change again.
Under the file name is a field where you can enter a caption for the picture. Press here to Enter or Tab key when you're finished changing and press Ctrl+Z to undo all changes in the text box again. In this field, the manufacturer usually has its own name (which you can remove the batch processing as above has already been discussed). The caption will be used by some presentation programs, such as the JAlbum program , which I also used to publish photo series on the Internet.
The picture is generally smaller so the entire picture is visible in the selected window. The area for photos to show you can be increased by checking the 'Full Screen' checkbox. Then the entire screen is used by the Viewer window, the title bar with the system buttons is omitted. If you also checked the checkbox for 'Hide this bar' the bottom bar is removed and you must operate the system with the pop-up menu or keyboard. You get the keys back by un checking the checkbox for 'Hide Toolbar' in the pop-up menu or pressing the Esc key. Have you selected full screen then after pressing the Esc key the normal window is displayed. The toolbar will then appear when you press the Esc key again. Via the F11 key you can toggle between full screen and normal window.
If the window is larger than the picture, then you will a black area around the photo. In a very broad (panorama ) Picture you see a big black space above and below the picture. To see a picture more in detail you can use that space by checking the checkbox 'Use full height windows'. The black space is then filled under the photo and a scroll bar is added, which allows you to scroll horizontally through the picture. This is even better with the mouse: Click the mouse on a point in the photo that you want to move and hold down the mouse button (the cursor takes the shape of a hand) move to the point where you want to go. Release there the mouse button.. It is also possible to automatically scroll through a panorama in the same way as happens with the panoramic pictures on my web site (for example, click here ). Move the mouse in the picture from center to see this. Do not press a mouse button!
If you tick the 'Show image data ' checkbox, there will appear at the bottom an extra bar for the main EXIF data. You can record more data in the log file set via menu topic 'log record dat' from the pop-up menu.
The first line you see: The Rapture Date, the width and height of the photograph the file size in kbytes, set ISO speed, an indication whether or not flash is used, white balance and camera model. Recording date in the field of when you can give in the format Year: months: days hours: minutes: seconds. Simply type in the numbers, the year in 4 digits and all other fields in two digits. Press the Enter or Tab key when you're done.
On the second line are successively: the used aperture and shutter, an exposure correction factor if used, the focal distance, preferably using the program, the used metering and far right you can see if the photo GPS contains data, the position on the globe where this picture was taken.
If this position is visible, it is also a link where you can click to the position visible. This happens on a map in Google Maps when you click on the link. If you do the Ctrl key, then the position is visible from space through the program Google Earth the last program you must however first be installed on your PC otherwise an error message given.
You get the position from a GPS track log file, as already discussed above. You have no GPS, then you can program via Picassa (menu 'Tools' / 'Geotag') together with the Google Earth program, the position in a photo store.
Not all these details need to be visible, it depends on the camera type. Check the manual of your camera to the possibilities. The terms used to program exposure and metering also depend on the camera, so here is the corresponding number in the EXIF data is given.
All the functions discussed can also be started from the keyboard. The corresponding keys (combinations) are shown in yellow hint when you move your mouse cursor slowly over the corresponding button. Via the right mouse button you can display the pop-up menu in the Viewer window which allows you to execute the same and even more functions.
The pop-up menu can also be opened from the keyboard by pressing the F10 key. Keep the Alt key, otherwise under the underlined letters Vista does not emerge. Then press the Alt key still pressed the button corresponding underlined letter in the desired action to perform that action. Then release the Alt key.
The pop-up menu topic 'Change the other recording dates in the same way 'you can only select as the recording time of the photo viewer has changed. After you click the record date has changed, right-click the picture and click on this topic in the pop-up menu.
With the pop-up menu items 'Copy location' and 'Paste location, it is possible for the GPS location to copy and paste. The recording time can be taken if desired. This can be used for example after compiling a panoramic photograph, the recording time and location to incorporate into one of the original photos.
By pressing the pop-up work under 'Log exposure data' button, the image data of the photo in the log file written.
With a GPS receiver, you can see what the coordinates (latitude and longitude) of the place are where the picture is made. On my GPS page you can find more information on the operation of a GPS. Many GPS receivers can, while walking or cycling a route, save the track in a track log file. The GPS stores than from points where you have been, the time, longitude and latitude in the track log file.
If you take a picture, the camera saves the recording time in the EXIF data of the photo. At the same time the track log file saves the longitude and latitude of the camera position with the recording time. This is later used in program EditPhotoInfo to store the position in the EXIF data block of the photo.
Do this by clicking the Track log button in the 3th panel. You will see an open file window. Select your track log file with the extension .gpx corresponding with the photos in the photo folder. After you have pressed the OK button the locations are is automatically added to the photos.
If the location of an image is found you will see it in the right window for example:
'DSC1023.jpg '-> Exif Time: 5/1/2009 15:28:59, Track Log Time: 5/1/2009 15:29:09, Lat: 37.317993, Lon: -7.581656
DSC1023.jpg is the filename of the picture. Exif time the recording time from EXIF data. The Track Log Time is the time of a point from the track log file that was closest to the recording time. The number after 'Lat' is the latitude in decimal degrees (negative for southern hemisphere). The number after 'Lon' is longitude in decimal degrees (negative for points west of Greenwich in London).
If no position is found where you see the following message:
No GPS loc. 2009:01:05 15:33:26 for time out 'DSC1024.jpg' in the track log file
You will receive notification if the GPS was off when the recording was made or if the clock in the camera synchronized with the time that the GPS system.
In the latter case you can correct it by entering in text box 'Camera time - GPS time (sec) ' the time difference, next you click again the track log button.
You can add the location from the keyboard to the clipboard and optionally also in the picture visible in the Viewer window. Also this action is again possible via the pop-up menu, and with Ctrl+E keys combination. You will then see the following entry:
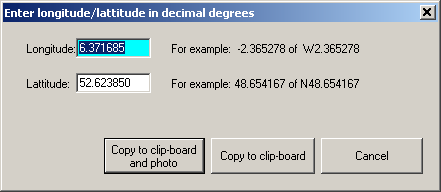
Enter the latitude and longitude as decimal degrees, which is the format that you see right of the input. A point separates the whole degrees and the fraction. Press one of the two left buttons if both fields are entered. If you have pressed the middle button, select next the picture for which this location is intended and paste it via Ctrl+I or the pop-up menu.
If the coordinates of the shooting locations are stored in the Exif data, as above described, then you can visualize the recording locations in a JAlbum presentation using Google Maps and / or via Google Earth. I use the presentation program JAlbum with my Slide Show 4 skin to show my photos on my web site Click here and then on a small photo if you want to see an example: you'll see a link above the large pictures to Google Maps. By clicking on the link the location will be shown in a new window.
Then you start EditPhotoInfo and opens the folder where the original pictures of the presentation are.
Then check in panel that says 'Google Earth kml-file' the checkbox to use photos of the website. Set also checkmark 'Make also Google Map web-page' if you like to show the contents in a browser via a web-page 'GoogleMap.html'.
If you click the 'Make file' button then a Google Earth file map.kml is made in the root of the JAlbum presentation with for each picture that contains coordinates a waypoint indicating where the photo was taken. If that file is opened in Google Earth and you click on a waypoint, the picture itself is also displayed in Google Earth. Click here to see an example. The name of the folder for the waypoints can be entered behind 'Waypoints map name:'. If the photos are on a web site, then you can check 'Use the photos on the Web site'. That only works if the URL of the site is completed on the options page. If the web site is not checked, then the photos in the photo folder on the PC are used. Next press the 'Waypoints' button to show the waypoints in Google Earth. Do you have the GPS track log file converted with my program 'ConvertTrack ' into a KML file, you can also display it in Google Earth and save it in the same folder as the waypoints file. The combined result can be saved via 'Save Place as' as map.kmz file. Click here to see an example in Google Earth..
You can show the waypoints and track in your browser via Google Maps, no special program is required. To do so, enter the URL of the kml file in Google Maps search box at the top and next click the 'Search Maps' button to the right of that box. The links to that page are under the 'Link' button. Click here to see the same example in Google maps.
If you have a panoramic photograph of a width more than twice the height, then you can create a Web page via the pop-up menu in the Viewer, select item 'Make web page for panorama photo'. You will then see the following window:

This creates a web page as an addendum to a web page created by JAlbum program with Slide Show 4 skin. The default pages created by this skins shows panoramic photographs small. The web page created via this window allows for horizontal scrolling through a panorama photograph. For an example of such a web page click the 2nd picture in this album and next click the expansion button in the upper left corner.
The quickest way of working is as follows: Create with the JAlbum program a slide show from the same folder as is used in the picture viewer. Then select in the viewer the first panorama photo and open the window shown above via the pop-up menu. The program asks you first to browse to the image in the album slides directory which corresponds with the panorama photo. With the Slide Show 4 skin, it is adviced to make only a large picture file by checking checkmark 'Make no webpage: convert only the photo and saves it in the slides folder'. If that checkmark is not checked, the Web page is created and if 'Show the panorama in your browser after the web page is ready' is checked, the page is automatically opened in your web browser.
In presenting a panorama is a java script file is used. You can leave this file in the folder where the web is made. This has the disadvantage that in case you have a lot of presentations, the script file is duplicated in all slides directories.You can also choose to file the script file in the root of your web server and give all presentations a link to that script file. The correct URL of the script file should be entered behind 'Use internet script file:' (this address is not validated by the program) and you must select the radio button.
The next 2 text fields show the desired height of the photo in the Web page, the quality used to convert that photo in the desired height to the web folder (high quality requires more disk space and longer time for the photo to download) and the last checkmark indicates whether it is a 360° panorama.
The description is put above the photo. This is a copy of the caption in the viewer, but you can still change the web page caption here.
If the photo contains GPS data the box 'Show a link to the location in Google Maps and Google Earth' is enabled. If checked links are added to view the location of the photographer in these programs.
Make the web page by clicking the OK button or look first to this help file by clicking the Help button.
It is now possible to make a link to an existing panorama page instead of making a new panorama page. To do this, put the URL of the panorama page in the text-box behind the check box with the text 'Use existing 9360Cities) panorama page' and next check the check-mark.
Starting with Slide Show 4 skin version 1.6 iit is no longer required to make external html files for the expansion of panorama photos, but it is usefull to use for panoramas larger images as produced by the jAlbum program. That is possible with this window. To replace the image made by the jAlbum program, check the checkmark 'Make no webpage: convert only the photo and save it in the slides folder', select the required heigth and quality of the panorama picture in the slides folder and click OK.'
It is also possible to test a (360 degrees) panoramic photo if there is not yet an album made with this photo. To use this, browse if it is asked to browse to the ' slides' photo, to the original picture and after the error message, select the test.
For making a Slide Show 4 album, you should execute next actions in the following order:
With the 'Slide Show 4' skin you can do these actions in the same order, but you can skip point 7.
You can save the picture in a lower resolution for use on a website by clicking in the Viewer the button . The program shows then next window:

On top you see the filename of the picture to convert. The converted picture will be saved in another folder with the same picture name as the original picture. That folder is displayed in the second textbox. You can choose another folder with the browse button at the right site of this textbox.
In the other fields you define the properties of the converted picture. You may choose to diminish the dimensions of the converted picture by a percentage given in the input box after the text 'New size in %:'. This percentage derives the new height and width from the original dimensions. You can also choose to input the desired heigth or width of the converted picture. If you input the new width, the new heigth is automatically calculated with the aspect ratio of the original picture.
Finally you choose the quality used to convert the photo (high quality requires more disk space and longer time for the photo to download).
Click the OK button to save the picture in the defined dimensions and quality. If the folder for the converted pictures contains already a file with the same name, the file is overwritten without a warning.
The ClickOnce installation program is no longer used, we use now the Actual Installer program.
The help file is removed from the exe-file, it is now only accessable via Internet.
Visual Studio 2017 is now used.
Google Maps page uses now svg icons as used in version 4 of the Slide Show 4 skin.
CSS code "padding-bottom: 80px;" has been added to the html tag for page GoogleMaps.html to hide the iPad tool-bars in landscape mode.
If the new check-mark 'Back button closes window' is checked, clicking the red button with the cross closes first the window. If it is unchecked it returns immediately to the previous page (such as the 'Back' button of your browser).
The Play button on a panorama page has been replaced by a Next button.
Up/down swipe support added to Open Google Map / Close window. For an example click the 2nd picture in this album and next click the expansion button in the upper left corner.
The creation of the Google Earth file is adapted for the new PhotoSwipe skin,
It is now possible to use the right/left arrow keys in the viewer to go to the next/previous photo.
The EditPhotoInfo.log file is now saved in folder Documents\WolffSoftware
Installation is now done with InstallShield.
Two buttons have been added to file GoogleMap.html, a button to downoad the used kml/kmz-file and a button to close the webpage and return to the jAlbum album. GoogleMap.html uses the resources of the Slide Show 4 album, but if another skin is used, the 2 button images are fetched from internet: http://andrewolff.jalbum.net/Help_SS4/res/google-earth.png and http://andrewolff.jalbum.net/Help_SS4/res/close.png .
All Slide Show 3 functions have been removed.
You get now a warning if you try to make a GoogleMap webpage and no webpage root folder has been defined.
Because Google has indicated that after February 1, 2015 no longer on maps.google.com KML files can be read another solution has been implemented: It is now possible to create automatically a GoogleMap.html file in the folder where the Google Earth KML waypoints file has been created. The "Make GoogleMap page" check-mark should be set to create the GoogleMap.html file automatically.
The Link function is removed, this button is now named "Update Google Maps link". Click this button to create the GoogleMap.html file and the Google Maps link to this web page. You must then still upload the file index.html and GoogleMap.html to your server. This allows you to update album files that have been created before December 1, 2014, so that the Google Maps after 1 February can be viewed in a browser.
"&output=classic" added to the Google Maps link.
The set-up files have been moved to another location, so the automatic update will probably not work. Install EditPhotoInfo again from my software download page.
Better validation of input fields in the Viewer.
Scroll-bars added to the main window because thee "Change data" button was invisible on small screens.
Bug fix in case a panorama picture was made without a webpage.
The layout is now more compact so that it can be used with a screenheight of 800 pixels.
You can now save the picture for a web.
A new checkbox 'Rename corresponding files with the same name but another file extension', allows you to rename other files with the same name. Use this if you record your photos both in RAW and JPEG format.
The 'Make web page for panorama photo' function voor de Slide Show 4 skin chnges now the picture dimensions of the panorama photo in file slidePage.js.
The splitterhas been removed from the main page.
The 'Compress Slide Show 3 album' function has been removed because the Improved Slide Show 3 skin is obsolete and is succeded by the Slide Show 4 skin.
The checkboxes 'Google Earth links' and 'Google Maps links' are removed because it was only valid for the Improved Slide Show 3 skin.
Spaces at the begin and end of a description will be trimmed if 'Remove from comment:' is checked. Control characters are also removed.
For the Slide Show 4 skin starting with version1.6 you can now make larger panorama slide pictures with the 'Make web page for panorama photo' function.
If 'Delete from comment' has been checked, leading and trailing spaces will also be removed.
If you move a picture, it no longer also stored in the waste-paper basket.
It is now possible to test a (360 degrees-) panoramic picture if there is no album made for that picture. To do so, select the original photo as 'slides' photo and indicate after the error message that you like to do a test. An html file will be created in the picture directory which uses the selected panorama picture. The picture will not be converted to a lower quality.
It is now possible if you select the panorama web-page function in the viewer pop-up menu to make a link to an already existing panorama web-site. For example if you published the panorma already on the 360Cities.net site.
The 'Copy location' function in the viewer pop-up menu, puts the location also as a string in the clipboard, so that you can use it to indicate the location if you publish a panorama at the 360Cities.net site.
The problem with panorama web pages if the slide order was changed in the jAlbum program has been solved.
Problem with the Google Maps link in a panorama web page solved.
The program is adapted for vs 1.3 of the 'Slide Show 4' skin.
The program is adapted for my new 'Slide Show 4' skin, it is now also for that skin possible to generate a webpage for a panoramic picture and waypoint kml file can also be generated.
The generation of webpages for panoramic pictures has been simplified, but these pages can now only be made for the Slide Show 3 & 4 skins.
In a Slide Show 3 compression the slide html pages are now automatically removed and after the compression it is now possible to add panoramic webpages.
It is no longer possible to remove widgets from albums made by the jAlbum program.
License text added.
Because of the release of version 3.9.19 of the 'Improved slide show 3' skin the compress code has been adapted.
If you click the 'Slides'key with the Ctrl key simultaneously pressed, the index file folder is shown.
A new button 'Add locations to corresponding images' enables you to add GPS location and recording date/time to derived pictures like slide images made with the jAlbum program.
The button for closing the Help window in a compressed slide show is now visible.
The contents of the <meta charset> tag is now copied to file 'slidePageSS3.html'.
The Slide Show was not correctly working if there were no slide captions, this is now corrected.
The generated panorama web pages did not show the 'Close' button' and the description was shown twice. This has been corrected.
A new button 'Compress Slide Show 3 Album' allows you to replace the slide pages made with Jalbum skin 'Improved slide show 3' by one new page 'slidePageSS3.html'. This makes the album more compact, but more important it eliminates the image flickering on a Windows PC with the Internet Explorer and Google Chrome browser.
Another new button 'Remove the SS3 slide pages' enables you to remove the jAlbum slide pages after you compressed an album. If you click on this button with the Ctrl key pushed in, widgets from albums created with Jalbum will be removed.
If file extension '.htm' was used for a panoramic photo then the URL of the previous slide the extension was '.html', that's now changed in '.htm'.
It is now possible to remove widgets from albums created with Jalbum skin 'Improved slide show 3' and probably most other skins. These widgets show pop-up ads, so they will be removed by this action.
If your camera saves the orientation of the camera in the EXIF data of the photo, it will now be used to rotate the picture automatically 90 degrees clockwise or counterclockwise in the viewer. You can also in advance rotate all the photos permanently in the correct position.
In the Options window you can now define the properties of the picture shown in a waypoint window.
In the new version 3.9.8 of the JAlbum skin 'Improved slide show 3' is the slide page changed and this required a small change in the panorama web page generation.
In the new version 3.9.7 of the JAlbum skin 'Improved slide show 3' is the slide page changed and this required a small change in the panorama web page generation.
A minor change was required because the JAlbum skin 'Improved slide show 3' vs. 3.9.5 uses now a file common.css.
If Both Google Earth and Google Maps links for a Photo are created, you can choose in the Options window to have the same type of display for both maps. A 'Link' button has been added to display the link to the waypoints file on the web site for Google maps.
In the new version 3.8 of the JAlbum skin 'Improved slide show 3' is the expand panorama link changed and this required a small change in the panorama web page generation.
In the new version 3.6 of the JAlbum skin 'Improved slide show 3' are fast key commands added to access the Google Earth and maps links; therefore there were also changes required in the panorama web page generation and in the Google links generation part.
In the new version 3.4 of the JAlbum skin 'Improved slide show 3', is the link to the full panorama web page changed; therefore there were also changes required in the panorama web page generation. The Next/Previous arrow button on such a page is now no longer visible if the corresponding filed of the link is empty.
There is a new 'Slides' button added, which can be used to open the Slides folder with the Explorer.
Because of changes in version 3.3 of the JAlbum skin 'Improved slide show 3', the Google Earth en Google Maps links had to be adapted.
If only 'Google Earth Waypoints' is checked in panel 'Google Earth en Google Maps files' the map.kml file will be created in the photos directory
There is now an error message when the GPS track log file used for the camera positions contains no time information
When creating a Google Earth waypoint file an error message is displayed if the album folder not a sub folder of web based directory, while it is stated that the photographs of the site should be used.
The layout of a panorama web page is adapted for the larger buttons in the newest version of the JAlbum skin 'Improved Slide Show 3' allowing an easier interface on the touch screen of an iPad.
It is now possible to make a waypoints KML file for Google Earth showing where all the photos are made. A pre-condition is that the location is saved in the photos e.g. using a GPS track log file.
For the setup procedure is now the Microsoft. NET application ClickOnce used. In addition, the program is no longer in stored in the folder 'C:\Program Files\Wolff Software\EditPhotoInfo', but somewhere in a folder under %Userprofile%\AppData\Local\Apps\2.0\
If you Have no Dutch version of Windows, you see English text in this program. Therefore, the program has been renamed into EditPhotoInfo.
It is now possible to enter the location (longitude and latitude) by hand. Run this through the pop-up menu in the viewer.
Because the contents of the Slide Show slide.htt file was changed, Panorama's could not be previewed. It is now possible again by using my improved Slide Show skin 3.
This version of the program requires the Microsoft. NET Framework 4.0 or later version installed on your PC. That is default installed under Windows 10. This program is only tested under Windows 10, there is no support for older Windows versions.
To install the program you go to the download page of the author and you open the tab that says 'EditPhotoInfo' Then click 'Open the install page' and if the new page is visible, click the button 'Install'. Follow the instructions on the screen.
On my blog the installation is described in detail and there are images of all windows that you may encounter.
Copyright © 2003-2017 André Wolff. For this program, you do not need a license for non-commercial personal use, but for commercial use, you need permission from the author.
Issues with the software or having any suggestions or comments can only be registered through a e-mail to the author . The author is not obliged to respond or the software to modify or improve, but he will possibly do.
New versions of the software will in principle only on the download page of the author made available. Information about new releases you can also find on my blog .
This program is programmed in VB.NET with Visual Studio Community 2017.
Copyright © 2003-2018 André Wolff.